Thursday, 30 August 2018

Creating master pages in PageMaker

Creating master pages
In addition to using the default Document Master in your publication, you can create a master page from scratch, or create a master based on an existing master or publication page. If you plan to have several master pages that share one or more design attributes – such as position and formatting of page numbers, you can save time by designing the Document Master page or spread, and then basing additional masters on the Document Master, rather than creating each new masterfrom scratch.

To make a new master page you have to follow the following few steps:
1.Choose Window > Show Master Pages.


2. Choose New Master Page from the Master Pages palette meny, or click the new master button at the bottom of the palette.


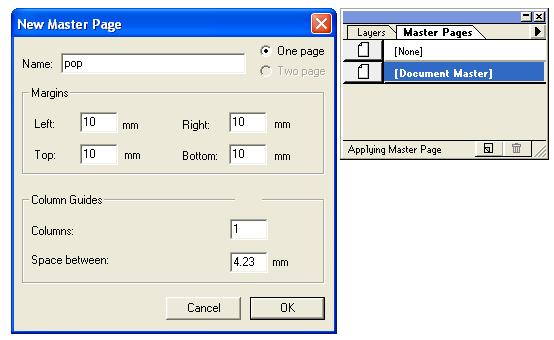
3. Type a name for the master and specify whether you want a single page or a two-page spread.
3a. If your publication is single-sided, you do not have the option of creating a spread. 


4. Specify the margins, number of columns and space between the columns.
4a. If you are creating a two-page master spread, be sure to specify columns and the distance between them for both left and right hand pages in the spread.
5. Click OK.

Applying the Same Master to Several Pages throughout a Publication (PageMaker)


How to apply the same master to several pages throughout a publication?

The answer for this question is the following few steps:

1.Choose Window > Show Master Pages.

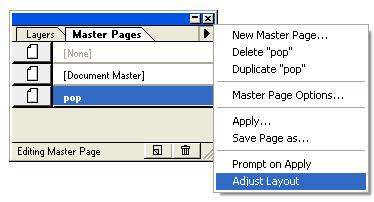
2. Choose Apply from the Master Pages palette menu.

3. Type a range of pages to change.
3(a) If appropriate use the Page Range text boxes to type a contiguous range (use a hyphen to separate the first and last page numbers in the range- as in 3-6_, a discontiguous range (use commas to separate the numbers – as in 2,5,8) or a combination of both. For example  - typing “2,4-7,11” applies the specified master to pages 1,3,5 and all subsequent pages in that publication.

4. Select Adjust Layout if you want objects and guides on the specified pages to be repositioned or resized as appropriate for the margins and columns of the master you are about to apply.

5. Click Apply.

These following figures will help you to understand it clearly:


Setting indents and tabs in PageMaker

Setting indents and tabs:
Indents and tabs are powerful tools for positioning text. Indents move text inward from the right and left edges of a text object, and tabs position text at specific locations in a text object. You can create left and right aligned tabs; center tabs, which center text around the tab; and decimal tabs, which align characters at a decimal point. You can also apply a leader of any style to any tab. A leader is a repeated pattern, such as a series of dots or dashes, between the tab and the preceding text.

Setting Indents:
Following are the ways in which indents can be set:
1.Move indent markers in the Indents or Tabs dialog box.
2.Type indent values in the Paragraph Specifications dialog box.
3.Type indent values on the Control palette in paragraph view.

1. To set indent using the Indents or Tab ruler:
(a) In layout view, click an insertion point in a paragraph or group of paragraphs.
(b) Choose Type > Indents / Tabs


(c) Drag the indent markers on the ruler to where you want left, right and first line indents to be. When you release a marker, the indentation is displayed in the Position box.
(d) Click OK to set the indents.

2. To set indent using the Paragraph command:
(a) Click an insertion point in a paragraph or select a group of paragraphs.
(b) Choose Type > Paragraph


(c) Type values for the Indents options and then click OK.

3. To set indent using the Control Palette:
(a) Click an insertion point in a paragraph or select a group of paragraphs.
(b) Choose Window > Show Control Palette, or click the Control palette to activate it. If the palette is in character view, click the paragraph – view button to display the paragraph options.


(c) Type values for the Indents options and then click Apply.

Formatting Paragraph in PageMaker

Paragraph attributes specify how your paragraphs appear on the page – alignment, position of indents and tabs and the amount of space before and after the paragraphs. In PageMaker, a paragraph is any contiguous text followed by a paragraph return. You can apply attributes to selected paragraphs or you can change the attributes of all paragraphs of a particular paragraph style.
PageMaker provides several ways to apply paragraph attributes, including the Styles palette, which lists a predefined group of character and paragraph attributes applied to selected paragraphs and the Control palette.

You can Format Paragraph by using these simple few steps:
1.Using the text tool, click and insertion point in a single paragraph or select a range of paragraphs.
2.Choose Type > Paragraph. The Paragraph Specification dialog box lets you apply formatting not available on the Control palette.


3.Select formatting options.

Formatting Paragraphs by Editing Paragraph Styles:
(a)Choose Window > Show Styles.


(b)Press Ctrl (Window) or Command (Mac OS) and click a paragraph style to edit. This opens the Style Options dialog box.
(c)Click Char, Para, Tabs or Hyph to select paragraph – level formatting options. The changes affect all paragraphs with that style.

Wednesday, 29 August 2018

Format the Header / Footer Text Block in PageMaker

Format the Header / Footer Text Block

Following are the steps you have to follow to position and format the Header / Footer Text Block:

1.   Use the  pointer to select a text block in the story for which you want a header or footer.

2.   The command is - Choose Utilities > Plug-ins > Running Headers / Footers.

3.   At the top of the sample page, select the master or publication pages that have the guides you want to use for positioning purposes.


4.  Click or drag the Place icon to create a text block placeholder, and position it where you want the header  or footer to appear. To remove a placeholder, drag it off the page.

5.  Use the nudge buttons or the Position and Width boxes to finalize the placement and width of the selected placeholder. The position is calculated relative to the publication’s zero point, which is indicated in the page preview. The leftmost nudge buttons snap the placeholder to the nearest guide.

6.  From the Content Style menu, select a paragraph style with which to format the text that will appear in the selected header or footer text block.


7.  For Apply to, select a page range for the selected text block or select Each Page in Story. This determines which pages the selected running header will appear on. Use the Range text box to specify a contiguous range(type a hyphen to separate the lowest and highest pages in the range, such as 3-6), a discontiguous range  (type commas between the numbers, such as 1,2,7,9), or both. For example, “1,3-6, 10” applies the header or footer to pages 1,3,4,5,6,10 and all subsequent pages. 

8.  Repeat steps 4-7 for each running header or footer text block you want to appear.

Setting Margins and column guides in Pagemaker

Setting Margins:
The margins you specify in the Document Setup dialog box are applied to the Document Master (the default master page initially applied to all pages in a new publication). When you create additional masters, you can specify margins different from those of the Document Master.
When Double-sided is selected, margins are set as Inside and Outside. The inside margin is on the right side of even-numbered (left) pages and on the left side of odd-numbered (right) pages; the outside margins are- correspondingly reversed. When Double-sided is deselected, PageMaker changes Inside and Outside to Left and Right margins. Margins appear on pages as pink (horizontal) and blue (vertical) nonprinting lines.

Setting margins Command:
Choose File > New or File > Document Setup.


To change the margins, type the values in the Margins area, and then click OK.

Invisible grid defined by rulers:
The rulers set up layout grid so it is a good idea to choose a measurements system before you begin laying out pages. You can set the unit of measure separately for each ruler. For example, you may want to measure vertical lines of text vertically in points, but prefer millimeters for margins, tabs and other horizontal measurements – (a) the horizontal ruler is set to picas; the vertical ruler is set to Custom, 12 points. (b) the horizontal ruler reflects the unit of measure used for most measurements in the publication. You specify tabs, margins, indents and other measurements according to the measurement system reflected on the horizontal ruler.
You usually work with one unit of measure throughout a publication, but you can change to another unit of measure at any time. Guides and – objects already positioned using the original measurement system will stay in place, and might not align with the altered ruler tick marks.

Hide or display rulers:
Choose View > Show/Hide Rulers.


The zero point:
The zero point is the position at which the zeros on the vertical and horizontal rulers intersect. When you start a new, single-sided publication, PageMaker puts the zero point at the top left corner of the page. When you work with facing pages, the default zero point is at the intersection of the top inside edges of the facing pages.
You can easily move the zero point to measure distances from a specific part of your page or to customize the way oversized pages print. To avoid accidentally moving the zero point after you set it, you can lock it in place.
To move the zero point – (a) Position the pointer tool on the crosshair in the zero point window. (b) Drag to the new location.  (c) Release the mouse button; the zero point is reset. Before and after zero point is moved.


Setting up column guides

You create columns to control the flow of text in text blocks that you place automatically, and to help position text and graphics. How you specify columns is determined by the command you use.
Working with newsletters and brochures often requires the use of columns. While you can create columns manually by setting your text block’s width, this process can be made easier by creating columns. As you create columns with PageMaker, a set of guides (like the page margins) are added to the page. When you first create your document, its default is one column per page. PageMaker provides the option of creating up to 20 columns on a single page. Between each column will be a “gutter.” The gutter adds some white space between each column so text will not appear on top of the next column. If you are using the columns for a brochure, these gutters should be larger to add space for folding. 

NOTE: If you want to set columns for all pages of your document, set them on the master pages.

Command to Create Columns:

Layout > Column Guides


This command creates a specified number of columns of identical widths, fitting them within the margins of the page. If text or graphics are already on the page, PageMaker can reposition them to align with the revised column setup if you select Adjust Layout in the Column Guides dialog box. See Adjusting a layout automatically for details.

The Utilities > Plug-ins > Grid Manager command fits columns within any area you specify, or creates columns of a specified width.


You can create up to 20 columns on a page.
To save time and ensure consistency, add column guides to master pages rather than to specific publication pages.

Setup columns on a page:

(1)Turn to the publication page or master page where you want the columns.
(2)Choose Layout > column Guides. When facing pages appear in the publication window and you choose Column Guides, then Set Left and Right Pages separately option appears so that you can set columnsdifferently for each page.


Type the number of columns you want on the page and the space you want between columns (the gutter). If you are setting left and right pages separately , type values for both pages.
Select Adjust Layout if you want existing text and graphics on the page to adjust to the revised column setupand then click OK. PageMaker creates the specified number of columns, equally spaced and equally sized.

Commands To Lock or Unlock Column and ruler guides:
Choose View > Lock Guides.


Note: The columns can be custom spaced. Just click on the left mouse button and drag into position. Release the mouse when the positioning is made.

Adding and Deleting Pages & Working with multiple open publications &Correcting Mistakes(PageMaker)

Adding and Deleting Pages:

Before you start with adding or deleting pages there are some points, you should keep in your mind. To preserve text or graphics on the pages your remove, first drag them to the pasteboard.

The Pasteboard is the area surrounding the page on the PageMaker screen. If you are refining your layout, you can move pictures, objects, and blocks of text onto the Pasteboard until you decide where to place them in your document. There is only one Pasteboard (not a separate Pasteboard for each page). Your view of the Pasteboard will not change when you change pages. 


1)To view the pasteboard, click View on the main menu then click Entire Pasteboard.


2) To go back to the page view, click the View menu then click Fit In Window.

You can also add or remove master pages.


Master pages is a template used to automatically copy or link elements and graphicdesign styles to some or all the pages of a multiple page document.

To add pages anywhere in the publication:
To add pages anywhere in the publication you have to follow few below noted steps:

1.Go to place where you want to insert pages.
2.Choose Layout > Insert Pages.
3.Type the number of pages you want to add, and select a location for the new pages.
4.Specify the master pages you want to apply, and then click Insert (Optional).

To remove pages:
To remove pages Choose Layout > Remove Pages.
Working with multiple open publications:

Several publications can be open at the same time, so it is easy to move or copy graphics and text from one publication to another. You can also compare page designs, search for and replace text and formatting, and check the spelling in all open publications at once. However, number of publications you can open simultaneously is limited by the amount of memory, or RAM, available on your Computer.

Each publication opens in its own window. To activate a window (bring it to the front), click any visible part of its window or choose an open publication from the list in the Window menu – Window > Tile/Cascade. The Window menu lists each open publication and any open story windows associated with the publication.

Window > Cascade


Window > Tile


In PageMaker for the Macintosh, you can send a window from the front to the back of all open windows by pressing Option and clicking the title bar.

The Right Mouse Button


Using right mouse button can make your work easier and will save lots of your valuable time. How? The answer is many of the PageMaker commands available from menus or palettes are also available from a special context-sensitive pop-up menu that appears when you click the right mouse button. The contents of the menu depend on whether you click an object, page or pasteboard.

Options appear on clicking Object:
Options appear on clicking Text:

 Options appear on clicking  Pasteboard:

Note:   You can press Shift and click the right mouse button to zoom in to Actual Size view and zoom out to Fit in Window view – the point you click becomes centered in the window.


Correcting Mistakes:

PageMaker provides two ways to correct mistakes or to reverse actions you have taken – (i) using Edit Menu command (Choose Edit  >  Undo) and (ii) using File Menu command (Choose File > Revert).

Correcting Mistakes using Edit Menu Command: 
PageMaker remembers your last action and lets you reverse it by choosing Edit > Undo. However, you must choose this command before performing any other action, as this command only reverses your most recent action. If you accidentally click anywhere on the pasteboard, you won’t be able to undo your last action as intended.


 Correcting Mistakes using File Menu Command:
This command (File > Revert) lets you go back to the last saved action. 


However, it can also restore your last mini-saved version, a version of the file that PageMaker saves automatically whenever you move to a different page, insert or delete a page, change the document setup, or print. Other operations that cause a mini-save include switching between layout view and story editor, using the Clipboard, and clicking the active page icon. To use mini save command you have to follow this –
1)Hold down Shift            2)Choose File > Revert.