|
Adjust Font Size
|
|
|
Increase by Increment (set in Preferences)
|
Cmd-Shift->
|
|
Decrease by Increment
|
Cmd-Shift-<
|
|
(add Option to the above keystrokes to make them Increment x 5)
|
|
|
Adjust Leading
|
|
|
Increase by Increment (set in Preferences)
|
Option-down arrow
|
|
Decrease by Increment
|
Option-up arrow
|
|
(add Cmd to the above keystrokes to make them Increment x 5)
|
|
|
Revert to Auto Leading
|
Cmd-Option-Shift-A
|
|
Adjust Kerning / Tracking & Word Spacing
|
|
|
Increase by Increment (set in Preferences)
|
Option-right arrow
|
|
Decrease by Increment
|
Option-left arrow
|
|
(add Cmd to the above keystrokes to make them Increment x 5)
|
|
|
Increase between words
|
Cmd-Option-Shift-\
|
|
Decrease between words
|
Cmd-Option-Shift-Delete
|
|
Clear all manual kerning, tracking, and word spacing
|
Cmd-Option-Q
|
|
Adjust Baseline Shift
|
|
|
Move Up by Increment (set in Preferences)
|
Option-Shift-up arrow
|
|
Move Down by Increment
|
Option-Shift-down arrow
|
|
(add Cmd to the above keystrokes to make them Increment x 5)
|
|
|
Scaling Pictures
|
|
|
Make sure the picture content is selected (not the frame that it's
inside)
|
|
|
Scale 5% Bigger
|
Cmd-Opt->
|
|
Scale 5% Smaller
|
Cmd-Opt-<
|
|
Scale 1% Bigger
|
Cmd->
|
|
Scale 1% Smaller
|
Cmd-<
|
|
Fitting Content & Pictures
|
|
|
Fit Content Proportionally
|
Cmd-Opt-Shift-E
|
|
Fill Frame Proportionally
|
Cmd-Opt-Shift-C
|
|
Center Content
|
Cmd-Shift-E
|
|
Fit Frame to Content
|
Cmd-Opt-C
|
|
Nudging Objects
|
|
|
Move by Increment (set in Preferences)
|
Any arrow key
|
|
Move by Increment x 10
|
Shift-any arrow key
|
|
Move by Increment x 1/10
|
Cmd-Shift-any arrow key
|
|
Flowing Text
|
|
|
Multi-Page Autoflow (creates additional pages)
|
Shift-click
|
|
Semi-autoflow (keeps text in cursor so you can continue flowing)
|
Option-click
|
|
Fixed-Page Autoflow (does not create additional pages)
|
Shift-Option-click
|
|
Styling Text & Working with Styles
|
|
|
Bold
|
Cmd-Shift-B
|
|
Italic
|
Cmd-Shift-I
|
|
Normal
|
Cmd-Shift-Y
|
|
All Caps
|
Cmd-Shift-K
|
|
Edit Style Sheet without Applying it
|
Cmd-Option-Shift-Double click style
|
|
Redefine a Paragraph Style
|
Cmd-Opt–Shift-R
|
|
Redefine a Character Style
|
Cmd-Opt–Shift-C
|
|
Working with Paragraph Styles
|
|
|
To remove local formatting (non Style changes)
|
Opt-click Style Name
|
|
To remove local formatting and Character Styles
|
Opt-Shift-click Style Name
|
|
Working with Master Pages
|
|
|
Override a single master page item on a document page
|
Cmd-Shift-click it
|
|
Override several master page items
|
Cmd-Shift-drag a marquee over them
|
|
Override all master page items on pages selected in Pages panel
|
Cmd-Opt-Shift-L
|
|
Insert Special Characters
|
|
|
Indent to Here
|
Cmd-\
|
|
Right Indent Tab
|
Shift-Tab
|
|
Discretionary Hyphen
|
Cmd-Shift-hyphen (-)
|
|
Nonbreaking Hyphen
|
Cmd-Opt-hyphen (-)
|
|
Type in Single Straight Quote (Foot Mark)
|
Ctrl-'
|
|
Type in Double Straight Quote (Inch Mark)
|
Ctrl-Shift-'
|
|
Current Page Number (Auto Page Numbering)
|
Cmd-Opt-Shift-N
|
|
Insert White Space
|
|
|
Em space
|
Cmd-Shift-M
|
|
En space
|
Cmd-Shift-N
|
|
Nonbreaking space
|
Cmd-Opt-X
|
|
Thin space
|
Cmd-Opt-Shift-M
|
|
Insert Break Characters
|
|
|
Column Break
|
Enter (on keypad)
|
|
Frame Break
|
Shift-Enter (on keypad)
|
|
Page Break
|
Cmd-Enter (on keypad)
|
|
Forced Line Break (or “soft return”)
|
Shift-Return
|
|
Moving Text Cursor
|
|
|
Move cursor to beginning or end of line
|
Home or End
|
|
Move cursor one word to the left/right
|
Cmd-Left/right arrow
|
|
Move cursor to Previous paragraph
|
Cmd-Up Arrow
|
|
Move cursor to Next paragraph
|
Cmd-Down Arrow
|
|
Selecting & Working with Text
|
|
|
Leave Text Frame and switch to Selection tool
|
Esc
|
|
Select from cursor to beginning or end of line
|
Shift-Home or Shift-End
|
|
Select from cursor to end of story
|
Cmd-Shift-End
|
|
Select from cursor to beginning of story
|
Cmd-Shift-Home
|
|
Select whole word
|
Double-click
|
|
Select line
|
Cmd-Shift-\ (or Triple-click)
|
|
Select one word to the left/right
|
Cmd-Shift-Left/Right arrow
|
|
Navigating & Scrolling Through Documents
|
|
|
Scroll using Hand tool
|
Option-Spacebar-Drag
|
|
Go to the First Page
|
Cmd-Shift-Page Up
|
|
Go to the Last Page
|
Cmd-Shift-Page Down
|
|
Go to Page (then type in page number)
|
Cmd-J
|
|
Switch between open Documents
|
Cmd-tilde(~)
|
|
Zooming
|
|
|
Get the Zoom in tool without selecting it
|
Hold Cmd then Space
|
|
Get the Zoom out tool without selecting it
|
Hold Cmd then Space and Option
|
|
Zoom In or Out
|
Cmd-plus(+) or Cmd-minus(-)
|
|
Fit Page in Window
|
Cmd-0 (zero)
|
|
Fit Spread in Window
|
Cmd-Option-0 (zero)
|
|
Access zoom percentage box (so you can enter a zoom level)
|
Cmd-Opt-5
|
|
Toggle between current and previous zoom
levels
|
Cmd-Opt-2
|
|
Find / Change
|
|
|
Insert selected text into Find What box
|
Cmd-F1
|
|
Insert selected text into Find What box and then Find Next instance
|
Shift-F1
|
|
Find the next occurrence of Find What text
|
Shift-F2 or Cmd-Option-F
|
|
Insert selected text into Change To box
|
Cmd-F2
|
|
Replace selected text with Change To text
|
Cmd-F3
|
|
Replace selected text with Change To text and Find Next
|
Shift-F3
|
|
Working with Panels
|
|
|
Highlight the first option in the Control panel
|
Cmd-6
|
|
Toggle Control panel between Character & Paragraph options
|
Cmd-Opt-7
|
|
Apply a value but keep it highlighted in panel
|
Shift-Return
|
|
Show/Hide all Panels including Toolbox
|
Tab (while not in a text frame)
|
|
Show/Hide all Panels except the Toolbox
|
Shift-Tab (while not in a text frame)
|
|
Expand/Collapse Panel Stacks
|
Cmd-Opt-Tab (while not in a text frame)
|
|
Create new (style, swatches, etc) & display options dialog
|
Opt-click New button
|
|
Working with Dialog Boxes
|
|
|
Rotate down through section of options displayed on the left
|
Page Down
|
|
Rotate up through section of options displayed on the left
|
Page Up
|
|
Jump to section of options displayed on the left
|
Cmd-1 for 1st, Cmd-2 for 2nd, etc.
|
|
Choose Yes, No, Don't Save, or Save
|
Y, N, D, or S
|
|
Miscellaneous Good Stuff
|
|
|
Select frame hidden behind another
|
Hold and keep clicking frame stack
|
|
Increase/decrease a value in a field
|
Click in field, press up/down arrow
|
|
Highlight the Last Used Field (in a panel)
|
Cmd-Option-tilde(~)
|
|
Tabs panel: Move Left Indent (triangle) without moving First Line
Indent
|
Hold Shift while dragging the (bottom) triangle
|
|
Select all Guides
|
Cmd-Opt-G
|
|
Select an Individual Table Cell
|
With Type tool, click in cell and hit Esc
|
|
Quick Apply
|
Press Cmd-Return. Then start typing a style name, menu item, text
variable, etc. Then press Return to apply.
|
|
Sort Menus Alphabetically
|
Hold Cmd-Opt-Shift and click on Menu
|
|
Toggle Typographer's Quotes preference
|
Cmd-Opt-Shift-'
|
Friday, 10 August 2018
InDesign CS6 Shortcuts for Mac

Thursday, 24 April 2014
Adobe InDesign: Introduction to the Page Tool
Introduction to the Page Tool in InDesign CS5


You may have missed the addition of the Page Tool to InDesign CS5. If you did, take ten minutes out to discover the capabilities this superb tool offers when working with multiple page sizes.
Step 1
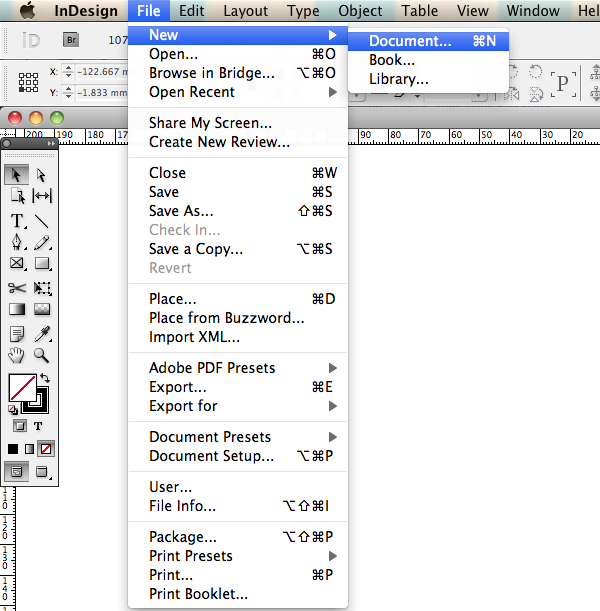
For the purposes of this tutorial we are going to set an A4 and A5 page alongside each other in the same file. Create a new document by going to File > New > Document.
Step 2
Within the new document floating panel input: Number of pages 2, deselect the Facing Pages option and select A4 as the page size. Feel free to edit the other option boxes to suit your project. Finally click OK.
Step 3
If it isn't already active open the pages panel by going to Window > Pages.
Step 4
Go into the options menu located at the top right hand corner of the Pages Panel and deselect 'Allow Document Pages to Shuffle'.
Step 5
Within the pages panel click and hold on the second page and drag it alongside the first page. When it is in the correct position a thick vertical line will appear indicating that it is okay to release your click. Once the click has been released the second page will snap alongside the first page.
Step 6
Locate the Page Tool from the toolbox and select it.
Step 7
Hover above the page you want to resize within the document and click once. The page will highlight blue.
Step 8
In the Control Panel a set of options will appear. Here you can control the size of the page, orientation and the point it registers to. You will also notice that there is a drop down menu with sizes preloaded.
Below is an example of my set up and how it looks on screen. If you haven't already save your document by going to File > Save.
Conclusion
That is it! Now you have a template for designing an A4 document which, when finished can be adapted to an A5 document in one neat file. These basic steps can be used on a variety of setups, from book dust jackets to gatefold magazine covers.
Adobe InDesign
Beginners Guides to InDesign

InDesign is a powerful design program with so many tools and features it can a bit tricky to find a topic to begin with. With this in mind, we've put together a collection of beginner guides on various InDesign topics like the best way to create a new document, how to import text and images and even useful advice on what to do when a document is corrupted and how to make comments and track changes. Work your way through the guides and you will be well on your way to mastering InDesign.

This Basix tutorial will give readers with no or limited InDesign experience the basic knowledge on how to set-up a document for print.
Step 1
Open InDesign and you will be presented with an introduction screen. It is here where we will start to create the new document. But before we create a new document we need to make sure that units used for measuring are set up correctly.

I work in millimetres for rulers and points for type. To change these values go to InDesign > Preferences > Units and increments. Under Ruler Units change the horizontal and vertical values to the desired unit of measurement. You will notice that I skipped the ruler origin. This needs a more detailed explanation which is covered in the next step.

Step 2
The origin of the ruler can be set to spread, page or spine. By selecting spread, the ruler will start from the left hand side of the document and span across the spread of the document.

By selecting page, the ruler will start at the left hand side and stop when it gets to the end of the page and it will start at zero again.

The spine preset is useful when you are using facing pages and of course have a spine. The ruler will start its zero point from the spine and work to the edge of the document.

Step 3
Ok, back to the introduction screen. On the right hand side select create new document.

Another floating screen will appear. Now before you format the document it will save time to have a rough idea of the kind of document you want to set (do a sketch for a rough mockup). I will be setting a folded A4 eight page newsletter. So my intent is print, number of pages eight with facing pages ticked and start page number one. If you tick Master text frame InDesign will automatically place a text box based on your document setup (three columns, same margins etc).

Step 4
Within the page size division you have a drop down menu with a selection of popular presets that are used worldwide. In my case A4 is present so I will select this. If you want to enter a custom size you can do so be typing directly into the width and height boxes. You can also define the orientation to portrait or landscape.

Step 5
As I planned out my design before hand I know I need a three column structure. I usually like to have my gutter set at half the size of my outside margins. As I have not determined the margins yet I will do it now.

Step 6
When setting margins I like to progress my sizes from smallest to largest in the following order: inside, outside, top, bottom. So my break down is as follows: inside: 12.5mm, outside 15mm, top 17.5mm and Bottom 20mm. When entering the values make sure that the link symbol at the centre of the margins column is not ticked. When ticked it will make all the margin settings the same.

Step 7
Ok I will now take the outside value and half it for my gutter, 7.5mm.

Step 8
I will set my bleed at 3mm which is the standard in the UK. Again the bleed option has a link feature which in this case is best ticked to make the bleed settings the same. I don't use slug. However slug can be used to place information and notes which will be seen by a printer and then cut off along with the bleed.

Step 9
If this is a document setup you are likely to use again in the future, navigate to the Save Preset button and press it. Give it a name and press OK. Next time you open InDesign this preset will be set up ready.

Step 10
If at any time you find you need to change the document size or bleed go to File > Document Setup.

If you need to adjust the margins or columns go to Layout > Margins and Columns

Conclusion
Good luck with your projects and designing. There will be other InDesign Basix Quick Tips coming up after this one so be sure to keep an eye out for them.
Subscribe to:
Posts (Atom)